Tuesday, 16 July 2013

Super Dungeon Explore - Big Rex


Let me introduce you to Big Rex, one of the two trolls that came with the Super Dungeon Explore boxset.

I really do like this guy, it's been ages since I've painted anything like this and I really enjoyed it. 

The paint scheme is virtually the same as the kobold warriors I posted earlier with the only main difference being that a selectively painted Agrax Earthshade into the recesses of the skin rather than doing a blanket wash over the skin.

The only other non-noticeable difference is that he's been given a couple of coats of gloss varnish before being de-shined with a coat of Matt varnish. With these models being handled by the kids and their friends, it makes sense to ensure they're well protected.

Anyway, here's Rex in all his glory ...


Hope you like him guys! 

And for you 40k fanatics, it is alive and well in the Corbanian household, keep your eyes peeled, I'll be posting those VL vets soon and then it will be time to tackle an age old challenge!

Tuesday, 18 June 2013

The strange things that reside on our painting stations


Yeah, it's just a booty boo chest with paperclip legs, standing on an upside down heroquest goblin with its head in a lump of blue tack, that's all guys.

Mel

Wednesday, 12 June 2013

Dettol - the hobbyists paint stripper


Let me introduce what I think is a damn fine paint stripper for wargamers, it's called dettol and it's an all purpose disinfectant. Now I've heard a lot about simple green but I'm damned if I can find any of it, I've also heard that fairy power spray is good for stripping models. To be honest, I couldn't tell you how good either of them are, and I'm probably not going to be able to tell you about them in the future because I'm sticking with Dettol from here on in.

It's really simply to use, just drop your models (metal or plastic - don't ask me about finecast, I don't buy that stuff!) into a suitable container like a drinks beaker and then pour in enough Dettol to cover them. Give them a swirl with an old tooth brush.


I left those metal snipers I got from eBay in for about two hours and after a quick scrub with an old toothbrush and then rinse it in water. 99% of the thickly applied paint came off in a matter of a minute's scrubbing and it's ready to be primed again.


A quick word of warning, I'm not going to say that Dettol doesn't damage plastic because it does. I put some SDE Kobold warriors in to strip after my wife had tried painting them and then I completely forgot about them. A week later, I pulled them out to find that the paint had stripped and the hard plastic model was perfectly fine but the model base which was made from softer plastic had melted as you can see in the pic.


So obviously over time Dettol does damage plastic but considering they'd been in a week and they only needed to be in for an hour, personally I don't see this as a problem, just something to watch out for.

Finally, another quick word of warning, Dettol seems to make the paint like a sticky tar substance which cleans off easily with Dettol but not soap and water. So make sure you wear gloves when handling them models and do it on a surface that's easy to clean gents!

Anyway, I'm off to strip some more models now I know how to!

Mel

EDIT - From the comments. Here's a list of other blog posts that cover different paint stripping fluids ...

If you've got a good relevant post, let me know in the comments and I'll get it added guys.

Tuesday, 11 June 2013

Kobold Warriors Paint Guide - Super Dungeon Explore


These guys are the first of the Super Dungeon Explore models I've painted and I have to admit, for a relatively simple painting scheme, these Kobold warriors have turned out really well. Since it's not my normal guard paint scheme and I'm likely to be getting more in the future, I thought it would be a good idea to detail the paints I've used. So, here they are ...

  • Primer - Halfords Light Grey
  • Bases - Base Adaptus Battle Grey
  • Skin - Base Foundation Mechrite Red, Drybrush Blood Red, then Blazing Orange, then Fiery Orange, Wash Baal Red
  • Teeth & Spines - Base Mournfang Brown, Layer Graveyard Earth, Layer Bleach Bone
  • Straps & Wood - Base Mournfang Brown
  • Armour & Blade - Base Gunbolt Metal
  • Eyes - Base Tausept Ochre, Layer Sunburst Yellow
  • Wash entire model with Agrax Earthshade, then drybrush bases with Codex Grey and then Fortress Grey. 
  • Relayer eyes, add Chaos Black pupil. 
  • Edge highlight metal with Gunbolt Metal. 
  • Rewash metal, cloth and spot edge define with Badab Black wash.
And there you have it guys, I hope you find it as useful as I'm hoping it will be to me in the future.

Mel

Monday, 10 June 2013

Super Dungeon Explore - A game for little Miss

There's a new game in the house - Super Dungeon Explore!


I'll be honest, I didn't know much about this game when we ordered it off ebay. I wasn't actually looking for a new game to play, I just wanted the models. With Corben getting into Heroquest and 40k, our little miss Willow was feeling a little bit left out on the painting front. So I got Super Dungeon Explore for the models, although after playing the game, we're well and truly hooked.


The game itself is easy to learn and play even for young kids. The boxset comes with 51 hard plastic detailed models in the 'Chibi' style where the models heads are the same size as their bodies. Here's one of the hero's I've painted up so far ...


Cute isn't he! Unfortunately I'm only allowed to paint that hero and the bad guys. You see, SDE coming into the house has an unforeseen consequence, my wife has taken an interest in painting. Here's her first attempts, she was quite keen to have me point out that they're WIP lol!


Now originally the models were supposed to be for little miss but it looks like we'll have to get something else for her as these are mine and the wife's now!

Anyway, more pics as soon as I've finished painting up these dragons and kobolds.

Mel

Wednesday, 22 May 2013

Orkys get a big boom gun!

Hi it's Corben again

Today I want to tell you about my tank I have built. My dad gave me a basilisk tank for me to convert into an ork looted vehicle. A piece of my tank was missing, so somebody sent me a part that I needed all the way from Africa.


My dad gave me a few bits to add on to make it look funky. My dad helped me to do the tricky bits like clipping the top armour off and adding the end of the barrel.


My dad has arranged me to have a session with the manager of games workshop so he can teach me how to paint it. It is 8th birthday in 3 weeks and I am hoping to get more orks.

Corben

(Big shout out to Da Masta Cheef for sending the bottom of chimera chassis all the way from America! lol. Also, big shout out to Ed, the manager of GW stoke who's agreed to do a masterclass session on painting vehicles, it turns out that he's a bit of a vehicle painting expert!)

Sunday, 12 May 2013

Pimping a Paint Station (Alt : Insomnia Nights)

I've mentioned before that my hobby time and space is pretty limited, having a small house and little ones running through it doesn't really mix well with dedicated hobby spaces. In this madness, my only area of hobby freedom is my painting station which when not deployed, waits patiently on top of a display cabinet, well out of the little ones reach.

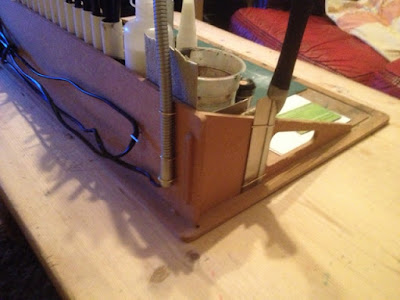
When is did come out, I used to spend a lot of my time searching for the right paint or tool because it was so cluttered with it being my only hobby space. So a few nights ago during a bout of insomina I decided to pimp up my paint station. I present the mark 2 paint station ....


The main addition is the tool and paint holder in the center of the shelf. I'm always struggling to find the right paint, brush or tool so I used 3/4 inch plastic piping to create a row of brush and tool holders, then foam board to create a paint pot holder for my 16 most commonly used paints.


My main painting light was a clip on desk lamp which was a pain in the backside because it's gripper base was broken so it was always failing over. So I broke off the base completely and grabbed my paperclips and pin-vice. After a short while of swearing and unsticking superglued fingers, I'd managed to fix the base of the lamp to the back of the paint station. I also made a nifty hobby saw holder on the side.


Finally, a clipper holder on the other side ...


Now it's literally put down, plug in and paint. I'm already noticing how much easier it is to work on and no doubt I'll keep adding to it and refining it, so keep your eyes out for a future post on the mark 3 version!

I'm interested to know if any of you guys have any space saving / storage tips for the hoarder hobbyist, let me know in the comments guys!

Mel

Friday, 26 April 2013

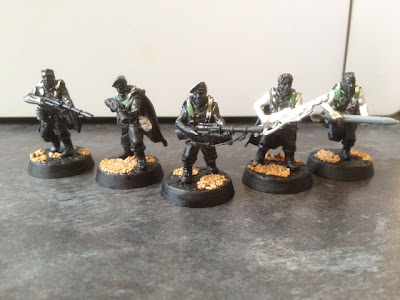
VL Vets ready for painting

I have a confession to make, I put the first five Victoria Lamb Rangers together way too quickly. I suppose it was because they were a present and I was excited to put together my first multipart metal models. I put them together and primed them that quickly that I really dropped the ball with them. I didn't think about the unit composition, I didn't clean up the mold lines, I didn't fill any of the gaps with green stuff. Hell, I even forgot to put gravel on their bases!


So, once my over eagerness had had a serious kick in the arse, I sat down and reworked them. First off, I filled in the gaps and blended the capes into the straps on the torsos as well as cleaning up what slight mold lines there were and added gravel to their bases.

Next came a composite change, first off I swapped the arms on one trooper for a different set. I needed the ones he originally had for a special weapon conversions. The other change was that I swapped out another troopers rifle for a rocket so he could act as the support guy for the squad's heavy weapon. It took a fair bit of clipping and filing to completely remove the lasgun type weapon, so much so that I had to resculpt the thumb on his right hand.

Another minor change across the five guys I did initially was that I broke off their waist pouches, canteens and scabbards, then replaced them with GW IG pouchs and grenades. The reason for this was that after I completed the first five, I realised that other than the bases, there was nothing really that tied them into my current guard models. So, with the next five I decided to make sure there were plenty of visual links to my current guard models.


Being veterans, there's plenty of unit options to include upgrades and therefore tie them into my current guard force. For the three special weapons guys, I went for a flamer, a meltagun and a grenade launcher. Ideally, I'd have gone for three plasma guns as Mike hates plasma but unfortunately, my weapon selection was down to what bits I had and not what bits I desired!

All three specials involved removing the lasgun type weapon, so lots of clipping and filling. I couldn't remove the weapon stocks, so I had to line up the arms and weapons to look like the special weapons came with shoulder stocks. Even though the GW IG weapons look a little large, I don't think it's excessive.

Next was the rocket launcher guy, I used catachen plastic arms for this guy. The muscles on them were far too large, so I filled them down. They're still quite big but with the addition of the rough bearded face, it gives the impression that he's probably the only guy in the squad who could carry the damn rocket launcher.

Finally, the squad sgt, this guy I really wanted to tie into the 41st millennium. So I went for the augmented power sword arm and plasma pistol arm for the high tech look. I did consider removing the shoulder pads but I decided that they actually helped tie the unit in with the rest of my force. Finally, I used a GW command head, specifically for the aquila on the cap.

So here they are, all ready for priming ..... again. Let me know your thoughts in the comments guys.


Mel

Tuesday, 23 April 2013

Victoria Lamb miniatures

With my invigorated passion for 40K, there comes new models!

My buddy Mike recently bought me a squad of ten guardsmen models for my army. He said they were a gift but there's a little bit of me that thinks he's emotionally blackmailing me to keep my hobby mojo going. Well, if that's the case, it's bloody working! I love these guys!


It's a squad of ten Border World Rangers from Victoria Lamb miniatures. The models are brilliant but they're posing a real challenge for me. It's the first time I've working with multipart metal models, so there's been lots of gluing arms and heads to fingers rather than torso's etc! Now, I'd like to make it clear that this is a fault with my modeling ability and not the models, which are truly excellent.

I really can't fault the detail on these guys, the molds themselves are so clean, I didn't realise they had mold lines until I'd primed the first five. They're perfectly scaled with GW plastic cadians, they're the same height, just a little slimmer, but that's perfectly acceptable as they've got bare arms and aren't sporting flak armour. Each ten man ranger pack comes with 10 legs, torsos, heads (all unique), cloaks, one piece arms and lasgun type weapons along with a good selection of pouches and bayonet scabbards.


The one thing that I am finding difficult is that the standard ten man ranger pack only comes with lasgun type weapon arms. Victoria Lamb miniatures do various other special/heavy/sgt arms for the ranger models that are quite good and could easily be called various IG weapons, it's just that I don't have any of them. I will in the future but right now, this has led me down the path of converting them. Here's my first go at swapping out  the metal weapon for a grenade launcher, let me know your thoughts guys!


All I've got to do now is two more special weapons guys and the squad sgt, so the bits hunt begins! Hopefully, I'll them them converted up pretty soon, I'll blog them when I do and then it'll be time to get them painted and added to 1st platoon. In the meantime, you can checkout the ranger and other future world ranges at Victoria Lamb miniatures, and if you buy any, let her know I sent you, who knows, she might send me some bits for free (cheeky yes but there's no harm in trying guys!).

Col

Monday, 22 April 2013

Da Grot's first Orks

Hi it is Corben.


I think that my orks are really good. My dad showed me how to dry brush and wash my orks. I made the clothes red because i want them to be speed freaks. My next model is killa kan.                                                                


Corben

Wednesday, 17 April 2013

Charybdis Campaign : Contact, wait out!

What follows is the notes, transmissions and journals of the commander of my guard forces me and Mike play through a narrative campaign with my guard surrounded by Mikes beautiful Tau force. You can checkout Mikes version of the campaign at http://faststrikescadre.blogspot.co.uk/. Hope you like it guys!

Col


+++Personal TechnoScribe Document
+++ScriptTime : 7 332 998.M41
+++Author : Major Tiberius Corbane, 3E/1CB

+++From the journal of Major Tiberius Corbane, Corbanian 1st

It was suppose to be an easy deployment, a chance for the men to rest and exercise their daemons from that forlorn hell hole. The men fought well in every engagement but repeated withdrawals from High Command have left them bitter and resentful. So many men lost for us to keep pulling back from those fething blue skinned Tau.

The thought of returning home to their loved ones had given the men a reason to hope and even I thought the madness to be over. This was supposed to be a regimental drop exercise but that changed as soon as the regiment started landing.

I can only assume that most of the regiment has been taken out during the drops this morning. That can be the only explanation for the bright flashes in the sky earlier and the lack of comms from so many regimental elements.

There is no doubt over who is responsible for this terrible act of cowardice, the sky's have been full of Tau flyers since the bright orbit flashes this morning. The conflict isn't just limited to the skies, smoke can be seen raising from the direction of capital city.

What guard units did make landing seem to be mobilising against the new threat. Even one of my own Hydra's took out an Orca earlier and the net buzzing with similar reports.

Lacking any official action orders, I've stood my detachments too and issued orders to establish an anti-air cordon around their landing sites.

I do not know the full picture, but what I do know is the enemy is known to us and this time, there will be no tactical withdrawal, this is our system and we will not abandon our loved ones to the same fate as Taros.

+++END


+++Vox Transmission Transcript
+++Transmitted : Vox 23453/152/1CB
+++Received : Vox 38675/152/1CB
+++Destination : RHQ
+++MissionTime : 7 332 998.M41
+++Mission : Deploy Extended Air Cordon Around 3rd Element Landing Zone
+++Ref : 34643470782685356
+++Author : Major Tiberius Corbane, 3E/1CB
+++Thought of the day : Idle eyes are worse than no eyes, they give the illusion of alertness.

5 Vehicle column comprising Command Squad  Veteran Squad, 2 Starstreak Hydra, Leman Russ deployed from 3rd Landing Element deployment zone in standard two column formation at 1300hrs Zulu. Immediately on exit compound, column under fire from woods on left flank.


Standard tactical doctrines followed. Command Squad advanced and deployed into woodland on right flank. Armour withdrew, redeployed in line formation, engaged enemy in woods on left flank. Veterans withdrew with armoured elements, provided close infantry support.


Leman Russs engaged Tau:Hammerhead on left flank, minor damage to Leman Russ, enemy vehicle destroyed. Command Squad secured cover in elevated position and engaged force consisting Tau:Crisissuits, heavy firefight followed, command squad combat ineffective due to casualties, transport destroyed, minor damage to enemy.


Veteran Squad rapidly redeployed in support of command squad on right flank, armoured elements provided fire support, transport destroyed, veterans engaged, enemy neutralised, veteran squad combat effective, reduced to half strength. Perimeter Swept and Secured, Air Cordon Deployed. End Mission

+++MissionStatus : Primary Delayed, Air Cordon Secure T+90
+++VehicleStatus : 2 Chimeras Destroyed, 1 Leman Russ Minor Damage
+++TroopStatus : 1 Command Squad Combat Ineffective
+++Casualties : Lt Gamus Wounded, 3 Veterans Dead, 6 Veterans Wounded
+++END

Tuesday, 16 April 2013

RSM and Sandy the Regimental Mascot


A little late posting this but I've finished my Regimental Sergeant Major and his dog Sandy, the regimental mascot. I'm really pleased with how he's come out, his face was the second proper face that I've tried to do and it's come out reasonably good. Sandy was a real challenge as I'd never painted a dog before but overall I think I managed to pull it off.


In other news, Corben's Orks are slowly coming on, we'll be posting them soon. He's also starting to learn the basic rules and as most kids his age, he's just soaking them up far better than expected. I also had my first proper game of 6th against Mike's new Tau force and I have to say, I'm loving the feel of the new rules, more on that coming soon.

Anyway, what do you reckon to the RSM and his pooch guys?

Mel

Monday, 8 April 2013

RSM and Sandy the dog

Things are really heating up on the hobby front although I hit a stumbling block once I completed my second hydra. The thing is, all of my next guard projects are all quite involved and with me only recently getting my 40k mojo back, they're all a bit overwhelming to be honest.

After a little thinking, I realised that the Corbanian 1st doesn't have a regimental sergeant major or a regimental mascot. So, I present to you, the RSM and Sandy the dog ....


Obviously the RSM is sporting his beloved pace stick and a rather nice powerfist, both from the Cadian command squad sprues, his body is actually the Baneblade commander but it works well for an RSM. Sandy is a great little model from a Tamiya accessories sprue. I should give due credit to Admiral Drax for the mascot idea, it's been rattling around my brain since he first posted 'after the war', his corgi regimental mascot. So, time to paint this terror from my nightmares up, I'm hoping to do a proper face on him, fingers crossed, I'll be able to pull it off.

On the gaming front, things are certainly heating up. My good mate Mike has created a new blog for his new Tau force. Mike's had a few Tau armies over the years I've known him, so no doubt it'll have some stunning models on it before long. The other reason for creating the blog is a new narrative campaign we're planning on running between his growing Tau force and the Corbanian 1st. More on that coming soon guys.

Finally, I'm getting really stuck into my The Terrain Tutor project. So far, I've filmed a few tutorials but I've got a lot of editing to do. I also really need a decent video camera, so I've decided to sell of some of my old armies on ebay. So far, I've listed my Dwarf and Undead armies from the 1980's, I'll be listing my High Elf army soon, followed by my Nids and Space Marines later this week. Hopefully, that'll generate enough cash to get a decent video camera and some more Ork models for little man.

If you're interested in any of those forces, check my Ebay listings.

Mel

Monday, 1 April 2013

2nd Starstreak Hydra completed!


It certainly feels good to get a model finished, especially as it's been so long since my last completed unit for the Corbanian 1st. This is the second Starstreak Hydra I've completed and although I was worried that I might be out of practice painting, it actually turned out quite nice. Anyway, here's the other shots ...


Finally, here's the pair together. I'm pretty pleased with how close their colour schemes are considering how far apart they've been painted.


Next up is a command vehicle for the squadron, I've already got the parts for what I'm hoping it going to be a pretty good looking conversion. I've just got to strip the chimera chasis I got of ebay and then hopefully, I'll be ready to go.

I should say that my 40k flame has been well and truly rekindled, my good mate Mike has decided to recollect his Tau force (he has a habit of selling them) and we're putting together the narrative for a campaign. So expect more 40k goodness soon!

Finally, I'm putting a lot of time into my new how to build terrain project, 'The Terrain Tutor', the blog is up and running, check it out here and for all you Facebook fans, it's also got a page at www.facebook.com/TheTerrainTutor. If you're interested in building wargames terrain and scenery, come and say hi!

Mel

Saturday, 23 March 2013

The Productive Project ....

As I mentioned in my last post, there's been a lot of changes on our home life recently, which has resulted in me starting a productive project, well I can't spend all that free time watching daytime TV can I?

So, what's this productive project I hear you say? Well check it out ....


Follow it on blogger, youtube, facebook or twitter and watching out for the 'big hands' in the intro video guys!

Mel

Wednesday, 20 March 2013

A Quick Update

Hey guys!

After last months deluge of posts, things have been a bit quiet on the blog front. Behind the scenes has been beehive of hobby goodness. So, here's a quick update on the past two-ish weeks. I apologise in advance for any ramblings, overly family related pictures and text, or sporadic plot jumps!

First things first, big shout to Da Masta Cheef for sending over the bottom chassis for Corben's Basilisk. In an interesting turn of events, Cpl Corben is now amassing an Ork force, meaning that the the first piece of artillery for the Corbanian 1st has been looted by a blond haired Grot! (Now I've actually typed that, I think I'll strip him of his rank and call him Grot from now on for betraying his namesake regiment). One of the aforementioned unwanted Ork bits from my brother was a forceworld ork bomber! (Cheers Bro!)


Obviously, we can't have unpainted models on the tabletop now can we, so the cpl grot has been blackmailed into painting. His little sister, not wanting to miss out on the action, decided she was going to paint something different!

 
Willow's plan was simple, she wanted to paint a fairy princess for heroquest. According to her, it would make everyone better with kisses from its gold butter fly and kick the bad guys in the fudge! (Don't let the innocent look trick you guys!)


Whereas the grot has been building up his Ork forces to take on the might of the Corbanian 1st! He's actually a pretty good painter considering ...


These family painting sessions has been spurred on by a new weekly get together with my good mate and occasional blogger Mike. These are typically Mike joining us for tea, spending a couple of hours painting and gaming with the kids, then once they're bedded down, we paint and do the things gamers do when they get together. It's certainly helped rekindle my 40k flame, even the grot is learning the 6th ed rules with us, albeit a much simplified version.

Here's his Ork's in action, you'll notice unpainted models! Truth is, you can't stop a kid from putting his toys on the table and you can't blackmail them into painting to play, you just can't. What you can do is tell them that painted models get to reroll shooting dice! The idea that he'll be able to reek more damage on his enemies (me) has certainly spurred him on with painting up his Orks.


Please excuse the pile of washing in that photo, our washing machine broke and that was the resulting clothes amassed over a week while we waited for the replacement to turn up. The washing mountain has now gone, although the ironing mountain still remains as my lovely wife is a serial washer but unfortunately not a serial ironer, that's my job! (Thank the Emperor for podcasts!) 

Anyway, on a lighter hobby note, I've attacked my second starsteak hydra with renewed vigour and there's only an hours work in it to finish it. Here's a WIP, expect a proper post on the finished hydras soon guys.


Leaving the best till last, I've actually taken on quiet a big hobby undertaking recently that's soaked up a lot of my time.

As a bit of background, now that both our lovely children have settled into school life, my darling wife (the serial washer!) decided that she'd had enough of being a stay at home mum, she was bored and so we discussed her going back into nursing. In parallel, for the past six months, I've been getting more and more fed up of the corporate life, hotel rooms, sitting on the M6, etc and to be honest, I've really missed the kids with me getting in at bedtime at best. So we decided to switch roles, she's the breadwinner and I'm the stay at home dad. It's only been 6 weeks now, but its going well and the maths work, so its looking good.

My wife was quick to point out that I would get bored very quickly when the kids were at school (and the ironing was done!), to which I pointed out I had a hell of a lot of models to paint and I'd be fine whilst sporting a very big grin, that was a mistake, a big mistake. Numerous expletives rolled from my lovely wife's mouth, a discussion developed and a condition was applied. It has to be productive ...

Now, I'm not going into details now, I'll save that for a near future post, but you'll love it! (Master of Cunning gents!)


See ya soon guys!
Mel (aka Col)

Friday, 1 March 2013

Theme song of the Corbanian 1st

Suicide is Painless by Mike Altman and Johnny Mandel

Through early morning fog I see
Visions of the things to be,
The pains that are withheld for me,
I realize and I can see...

      That suicide is painless,
      It brings on many changes
      And I can take or leave it if I please.

The game of life is hard to play,
I'm going to loose it anyway,
The loosin' card I'll someday lay;
So this is all I have to say...

      That suicide is painless,
      It brings on many changes
      And I can take or leave it if I please.

The only way to win is cheat
And lay it down before I'm beat
And to another give my seat
For that's the only painless feat.

      That suicide is painless,
      It brings on many changes
      And I can take or leave it if I please.
      And you can do the same thing if you please........


Legal bit ...

Copyright (C) 1970 by Twentieth Century-Fox Music Corporation,
8544 Sunset Blvd., Los Angeles, CA 90069
Twentieth Century-Fox Music Corp. Ltd., London W1, England
International Copyright Secured
Made in U.S.A.
All Rights Reserved


Thursday, 28 February 2013

Necron basing crystals anyone?


As I mentioned in my post yesterday, the dungeon accessories mold from Hirst Arts also has crystals on it. As I've been casting up my boxes and barrels, I've also been casting up crystals and everything else on the mold as well. This has left me with a reasonable collection of these crystals that I have no real use for and so I thought in true blogosphere community tradition, I'd pay them forward!


The crystals are cast in Herculite2, so they're a lot strong than plaster of paris but can still be trimmed down with a hobby saw or clippers and the bottoms can be easily sanded to alter the angle they sit on. I wouldn't recommend using hobby files on them to be honest, sand paper is far more effective. I should say that the do have the odd air bubble here and there, we're still perfecting our casting technique, but if you can deal with failcast, you can easily deal with these.

So, if you're a Necron player or have another great use for them, drop me a line in the comments and I'll get them over to you. If a few people want some, I'll split the pile, if there's loads, I'll randomly pick one or two of them. The only thing I ask is that once you've used them, send me a link so I can see what they look like painted up on a base.

Col