Showing posts with label Harker. Show all posts

Saturday, 26 November 2011

Harker finally gets deployed ....


There's a little bit of me that can't actually believe that I'm typing this. It's been over 18 months since I first started Sgt Harker and his squad of devils, to be honest there were times that I honestly didn't think they'd ever get finished.

It's hard to imagine what these guys were like when I first started them, they've had a serious amount of conversion work done to them. All the old catachen headwear has been removed and then they've all had t-shirts, cloaks and berets sculpted on to them. I must admit, I've learned a lot from doing them but I wouldn't want to have to convert every model this much, it'd take years to get an army complete.

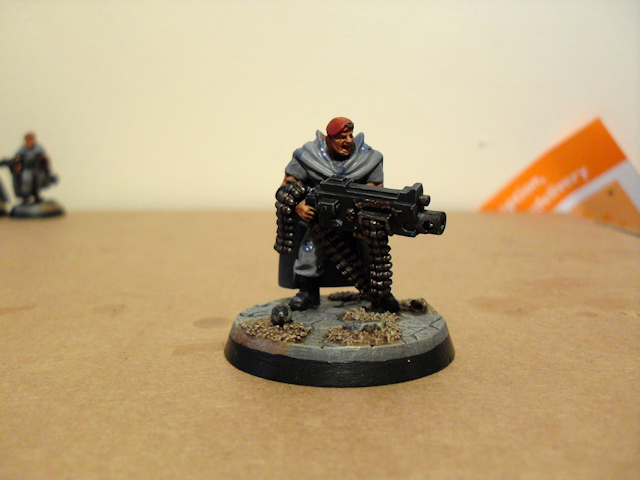
Anyway, sorry the light ain't brilliant but there's a couple of closeups, first off, we have the man himself, Vet Sgt Harker .....


Next up we have the three standard troopers, including scar face who got hideously disfigured during his dremmel haircut ....


Then there's the special weapon troopers and yes, the middle guy was another dremmeling accident, it was the first time using a dremmel - lol


Finally we have the demo troopers, luckily, I'd got the hang of the dremmel by the time I'd got to these guys ...


So there you have it, the first squad of first platoon, only six or seven more squads to go. Overall, I'm pretty pleased with them, they're not my best painted models, I'm still relearning to paint after my hiatus, but I'm still pretty pleased. Now all I've got to do is finish the second Starstreak Hydra ...

Saturday, 5 November 2011

A Quick Update ...

Just thought I'd post a quick update on my hobby progress since getting into our new home as I didn't want you guys to think that I'd disappeared again.

I'm actually working on Harker's squad and my second Starstreak Hydra at the same time which is a bit weird for me as I normally only work on one unit at a time. I simply couldn't decide which to do, so I decided to do them both. The downside of which is that it'll take me long to get finished pics on the blog.

So, here's a couple of pics of my progress, sorry the pics are brilliant, they were done with my phone because I can't find which box I packed our camera in yet!

Anyway, here's the Starstreak Hydra so far .....


Next up we have Harker's squad, I've almost finished their clothing but I wanted to show you their cloaks camo'd up. I still need to tidy up a few of the white spots, especially on Harker's cloak, but they're definitely getting there ...


So, that's it for now gents, I'll be post more as I get them done.

Col

Friday, 10 December 2010

Harker squad finally ready for painting

It's been a long journey and I've learned a hell of a lot about sculpting along the way but now it's time to put the sculpting tools down and get painting!

Here's the final pics of Harkers squad in all their green glory ...


The hoods came out quite nice and I've found a relatively simple way of doing them although I need to work on getting them to look more natural and blend into the folds of the cloaks better in the future.

Now it's time to crack open the paints and get these guys camo'd up!

Saturday, 27 November 2010

Update on Harkers squad

I thought I'd do a quick post on the progress of Harker's Squad. As I posted earlier, Harker's cloak got broke. This wasn't an accident, I did it because I've been playing around with sculpting cloaks and I reckoned that my newer type cloaks looked better than his old one which was very bumpy and patchily put together.

I've always liked the look of the flatter cloaks, compared to the more bulky fold styles ones. Dave Taylor has some excellent ones on his Tanith squad over on his blog. So, I bit the bullet and gave it a go. They're not perfect but for a first go, they turned out ok. First off, here's Harker ...


Next up, we have the lasgunners ....


Then the special weapon guys ....


Finally, here's the missile launcher team and the demo guy ...


There's still a bit of work to do on them such as adding the hoods and clasps on the cloaks. So guys, what do you reckon, do you think I've managed to pull it off?

Monday, 22 November 2010

Harker got broke!


That's right, my Harker model got broke, the cloak has come well and truly off!

So, how did this happen? Was it an accident? Was it done maliciously? Am I heart broken considering the hours I put into sculpting the cloak? Can it be fixed?

Wednesday, 21 April 2010

Harker got greened

I've finally finished customising my Harker model and I've got to say, I'm quite pleased overall. It's been a hell of a journey, there's been blood, sweat, tears and a whole load of swearing! I know he isn't perfect, but considering I'm new to sculpting, I don't think he's that bad.

I did a bit more work sorting out the folds of his cloak, mainly smoothing out the folds on the back of the cloak and the clasp in the centre of his chest. I also did his cap badge (Damn you Admiral Drax!), in fact, I did his cap badge about 17 times before it ended up as a sort of winging V symbol. That was a real challenge but I'm glad Drax mentioned it as he'd look a bit stupid without a cap badge.


I used a mix with a higher ratio of yellow to blue for smoothing out the cloak as it easier smooth it over the faults with a softer mix. I found this bit really challenging as I'm a bit obsessive compulsive with my hobbying and not matter how much touching up I did, it never seemed done, I just kept seeing faults. Anyway, I'll leave it to you decide ....


I also did a bit more work on the hood, basically just building it up and sharpening the edges. I wish that I could have put more folds into the hood but the base sculpt had already cured before I realised that it needed them.


And there you have it, my take on Veteran Sgt Harker.


So, wrapping up, here's what I've learned since last time .....
  • The smaller the detail, the longer it takes to get it right, damn cap badge!
  • I need to remember that it's not going to be perfect, so I must stop beating myself up over it.
  • It would have been far better to have done each fold in one go, rather than in sections and then touching them up.
  • I really need to use references and have a proper vision of what I want to achieve, this would have helped with the folds in the cloaks hood.
  • I'm slowly getting better at sculpting but I still can't use metal tools.
Well, that's it for Harker, hope you enjoyed following my little project, time to start work on his squad now.

Tuesday, 13 April 2010

Harker gets green - part2

I've spent the last week working on my Harker project. I've slowly added folds to the cloak as it runs over his shoulders. I had to do this very slowly as it's quite detailed work and I found that if I tried to do too much at once, all I did was mess up my previous work. As the shoulder folds were curing, I added the folds to the inside of the cloak. These were a bit rough but there wasn't much I could do about it since the areas are quite difficult to get to.


I slowly built up the folds, but it would have been so much easier to just have done the folds in one go.


Whilst the various folds were curing, I started work on the cloaks hood. It was at this point that I realised that I really hate hoods. The one in pics was my fifth attempt and to be honest, I'm still not completely happy with it but I just have to accept that it's the best I can do at the moment. I can't tell you how hard that is for me!


That's all for now folks, over the next couple of days I'm going to see if I can smooth out some of the flaws in the cloak and finish of fine detail. Finally, I'll leave you with a pic of what I've been doing with me spare green stuff and the lid of my vaseline .....


What I've learned this time ....
  • It would have been much easier to do the folds in one go.
  • I hate hoods, no serious, I really do!
  • Green stuff is like a scab, you just can't stop messing with it.
  • I should have done Harkers squad first and got more practice in with sculpting before doing Harker himself.
  • Zoomed in photos that show up all your flaws really don't do much for your morale.
  • You can still be manly and have a little pink tin of vaseline as long as you put daemon faces on the lid.

Wednesday, 7 April 2010

Harker gets green - part1

I got stuck into my mission to make my Harker look a bit more like a professional soldier. First off was covering his bare beef cake chest and so I green stuffed a T-shirt onto him. Considering I'm relatively new to sculpting, I'm quite pleased with how it turned out. I built it up in stages, working from the belly, then chest and then finally sleeves before sharpening up the collar and sleeve lines. I needed to rework the chest a little but overall, I think I've got the look of it right.


Once the Tshirt had cured, I started work on his camo cloak. The first part was to add the base that the cloak would be built on. I must admit that this was a bit tricky, but after a few attempts, I managed to get something I was happy with. I wasn't worried about the marks or uneven surface as all that would get cover when building the cloak, the important thing was to even a solid base to build the detail on.


Once it was cured, I mixed up some more GS but this time added more yellow into the mix to make it softer. I then used it to fill out the dips and get a more natural drop to the cloak as it curved over his buttocks so that it hung straight down. It worked pretty well, the only downside was how long it took to cure with it having less firming agent in the mix. I also built up the bottom right corner of the cloak at the same time. Once it had cured enough to work on, I started to add the folds of the cloak.


I then added the folds to the right side and the central fold which split off into two folds as they ran over the shoulders. At this point, it was all a bit rough but the plan was to let it all cure over a couple of days and then use really soft putty to smooth everything out.


Once I'd got the basic folds on the back of the cloak sorted, I started on he folds as they came over the crest. These turned out to be a nightmare and I really wished I'd done the cloak flowing from the chest straight from the start. In the end I only managed to get one set of folds done last night. Since the folds turned out to be a bit of a none starter, I decided that I'd have a go at the beret to see if I could cheer myself up, and that turned out rather well IMHO.


So, this is where I am right now, I'm pretty pleased with the t-shirt and the beret but I do feel that the cloak lets him down a bit. I just need to keep reminding myself that I am new to sculpting and so I can't expect it to come out perfect. Here's what I've learned so far ....
  • I've found that sculpting has a very steep learning curve!
  • It's very easy to mix up too much GS and waste half of it.
  • You should always work in small bits building up into big ones.
  • The more yellow you add to the mix, the softer the putty is but the longer it takes to cure.
  • You shouldn't try to add GS that's started to firm up.
  • Spending time making sure that the bottom of the cloak base is level and the corners aren't curved really pays off in the long run.
  • Cloak folds are best done from start to finish and not in halves.
  • Vaseline makes an excellent lubricant but you shouldn't say this out loud to your wife in the queue of the supermarket.
  • Sculpting is time intensive but has lots of curing breaks, so I need something to be doing during those breaks to make best use of my hobby time.
  • I am not a brilliant sculpter, but as long as I get better each time I give it a go, I don't really mind.
  • Finally, I still can't work with metal sculpting tools!
Hopefully, I'll be finishing him off over the next couple of days if I can get these bloody chest folds sorted!

Saturday, 3 April 2010

Harker or Harper?

Sometimes I wonder where GW gets their ideas for models and armies, and sometimes, I just know.

I'm not sure if you hobbyists across the pond in the States get the TV series Sharpe, but it's been on TV for quite a while over in the UK. It's a BBC production about an officer called Sharpe who raises through the ranks during the Napoleonic Wars.

OK Col, what's all this got to do with GW and VSgt Harker? Well, this guy, that's what ......


When Sharpe was first given a battlefield commission, he was given command of a detachment of the 95th Rifles, an elite group of chosen men. This detachment was led by Sgt Harper, a brute of an Irishman who carried a multibarrel rifle that only he could handle. Does that sound familiar?

Wednesday, 31 March 2010

Harker - planning and preparation

Here starts 1st platoon, a group of hardened veterans who get the job done. It seems fitting that I start a project with something special, and so I'm going to start this one with Veteran Sgt Harker. I picked up the GW model as part of my first months rewards for quitting smoking, but to be honest, I don't like him that much. I don't want to use a different model as I don't think the current cadians or catachens really work as Harker but I do want to do some work on the existing model to make him a bit different.


The problem is that he's a bit too beef cake and not enough professional soldier. First off, I just don't see a bare chested guy fitting into a city fight army, a beach volleyball team yes, an urban combat army no. So, I'm going to cover him up a bit and give him a t-shirt. Next up is the fact that he can infiltrate and has stealth and yet there's nothing on the model to convey these attributes, so I'll be giving him a camo cloak. Finally is his mohican haircut, it just doesn't fit the feel of a veteran sgt, and so I'm going to give him a beret as that has more of a special forces feel than just a bald head. Before I can do any of that, I needed to do a bit of work on him, mainly removing the pouch and strap that run over his chest and down his back. After 5 minutes with a pair of clippers and my dremel, I was left with ....


It's a bit rough but that's not a problem as it's going to be covered by the green stuff t-shirt, which is my next job. So now it's time to give my new sculpting tools and a clay shapers a go, more on Harker coming soon guys.