So, whilst doing Harker, I took plenty of photo's so I could write this tutorial. As I've said before, I'm relatively new to sculpting, so this isn't a masterclass, more a guide on how I did mine for those who've never made flat cloaks before. I should also say that this is more a tutorial on how to make a cape as cloaks have hoods and Harker doesn't have a hood, but at least it will show you the main part and adding a hood is relatively simple.
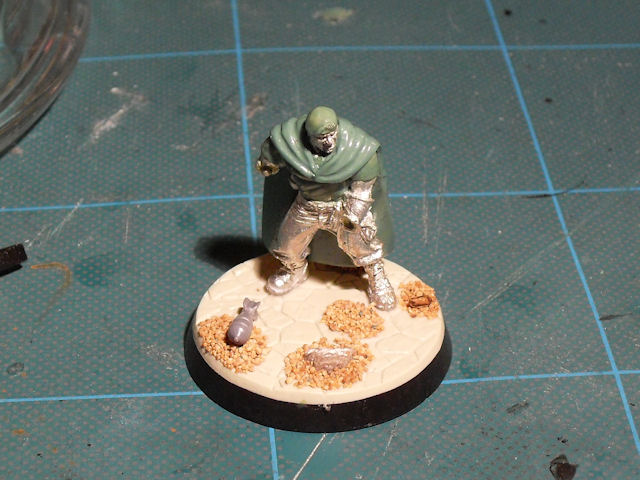
So, here's a pic of what the finished piece will look like ...

First off, you'll need a few tools. The main ones are the standard sculpting tool, a scalpel and two clay shapers, one with a flat edge and one with a rounded end. You'll also need some vaseline and a flat non-porous surface like a tile, base of a plate or glass bowl lid.

Mix a reasonable amount of green stuff together, I recommend using a mix with more of the blue putty in than the yellow as this will harden quicker making it easier to work the folds of the cloak and it will also produce a harder final cloak when the green stuff cures. Using plenty of water, spread your green stuff into a large flat piece that's larger than the model it's for. Don't worry about finger prints at the moment, just try to get it a about 2mm thick and as flat as possible.

Once you've got your flat piece, get your non-porous surface and spread vaseline over it. This will ensure your green stuff doesn't stick to it whilst you're cutting out the shape. I actually pushed the piece around the glass in small circles a couple of times first so smooth out any finger prints and then used my fingers to smooth out any remaining lumps to get it as flat as possible.
Next, with a wet scalpel, score a line across the bottom of the piece to form the bottom edge of the cloak. Then get your model as a reference and put a little mark in the piece where the collar line will go.

After that, use your wet scalpel to cut out the basic shape of the cloak. The top should be roughly as broad as your models shoulders. You can make the bottom as wide as you like, the more triangular it turns out, the more folds you'll need to put into it to get it hanging naturally from your models shoulders. You'll also notice that there are two points which extend beyond your collar line marking point, these are for going over the models shoulders and wrapping around the front of the model.

Once you have the shape right, careful lift the piece from the surface using your scalpel or the blade of your sculpting tool. Remember at this stage that the bottom is covered is vaseline from the surface, so you'll need to flip it over when you place it on the model, so the smooth side is showing and your non-vaselined side is against the model. Using your flat edge clay shaper, gently push the flaps against the top of your model's shoulders to fix the cloak in place. Don't worry about the tips of the flaps at this stage, just concentrate on fixing the cloak to the model.
You'll notice that the main bulk of the cloak hangs over my finger at the back of the model, this is to make sure that it doesn't stick to the model whilst you work on the shoulders and also ensures that you don't get any finger marks on the main surface.

Once the cloak is fixed, use your flat edged clay shaper to bring the flaps together at the front of the model. It's also a good idea to tidy up the edges of the cloak at this point, both the outside edge and the collar edge.

Next use your wet sculpting tool to score two lines in each flap radiating from where the flaps meet at the front, going across the top of the model's shoulders.

Then use your round ended clay shaper to smooth out your scored lines to form the front folds of the cloak where the material is gathered together. I can't recommend clay shapers enough for this job, they really do help make good looking fabric and clothing.

Once you've got the shoulders and front of the cloak sorted, it's time to work on the back of the cloak. You first need to put the main fold into the cloak. To do this, simply drape the cloak over the handle of one of your clay shapers. Make sure there's vaseline on the handle so it doesn't stick. You may want to help it bend by gently pressing on the edges of the cloak with wet fingers. Once you have the main curve in place, let gravity bend the cloak down naturally. Don't force it, as this could cause it to stick to the back of the model and could end up looking unnatural.
(It was at this point that I realised that I'd made the cloak a bit too long. To solve this, I placed the bottom of the cloak on my vaselined glass lid and trimmed 5mm off the bottom. There's a lesson in that - always measure twice and cut once!)

Next it's time to curve the outer edges of the cloak. Cover your round tipped clay shaper with vaseline including the ferrule (metal bit) and use your flat edged clay shaper to curve the outer edges of the cloak around the ferrule of your other clay shaper. Don't worry if the edges get a little wavy (you'll understand when you do it), just concentrate on getting the basic shape of the folds right.

Once you have the basic shape of the folds right, leave it for ten to fifteen minutes to cure a bit. When it's a bit firmer, you can go back with your clay shapers add smooth out any edges that don't look natural.

Next tidy up the folds as they flow over the shoulders with your rounded tip clay shaper.
Finally, extend the shoulder folds down the back of the cloak by gently scoring lines with your clay shaper. Have the outer lines run almost straight downwards and the inner lines downwards and inwards as if the were going to meet in the middle of the models back.

At this point, the main cape part of the cloak is done. As you can see below, you can easily make a number of different looking flat cloaks using these simple techniques.

You can take the cloak further once the green stuff has hardened by adding a clasp where the cloak meets at the front or by adding a hood. You could also modify the technique I've shown you here to make more realistic cloaks by feathering the bottom edge and adding tears into the fabric at the cutting stage but I'll save those for a future tutorial.
Hope you find it useful guys and as always, if you've got anything to add, add it in the comments. I'm always interested in learning more.
6 comments:
Cool tutorial, Colonel. You make it look very easy but I bet it was a tricky process! Time for a full Tanith army now!
Nice work Col Corbane and nice to have you blogging again. These flat looking capes suggest there made of a heavy canvas to me that wont easily crease and fold, was that what you were going for. Also i got one of those clay shapers on your recomendation and yes they are good and worth the money.
Nice tutorial. Can i ask where you got your clay shappers from, and which ones are they? Been looking around locally for these things but havent been able to find any!
Spot on mate! They look nice and will take a camo scheme really well. I've linked through to this tutorial from my feather tutorial, hope you don't mind.
Cheers
Dave
@The Antipope - Cheers mate, must admit, I must have done about twenty cloaks to get the ten guys finished. I'm not sure about a Tanith force, can you image how long that would take to do!
@Blitzspear - Glad to be back mate. I can't say that heavy canvas was what I was going for, but I'm happy with how they turned out. On the clay shapers, I can't even imagine how hard it would be to do the cloaks without them.
@The GunGrave - Cheers mate. I got mine from Ebay, they're the black tipped size 0 one's from Royal Sovereign. There's an excellent post of them here ...
http://40kmaunderings.blogspot.com/2010/03/sculpting-104-silicon-shaping-tools.html
@DaveTaylor - Cheers mate, and I'm chuffed you think it's link worthy :-)
This was really helpful! I've linked your work in my article: Modeling resources
Post a Comment