Saturday 26 November 2011

Harker finally gets deployed ....


There's a little bit of me that can't actually believe that I'm typing this. It's been over 18 months since I first started Sgt Harker and his squad of devils, to be honest there were times that I honestly didn't think they'd ever get finished.

It's hard to imagine what these guys were like when I first started them, they've had a serious amount of conversion work done to them. All the old catachen headwear has been removed and then they've all had t-shirts, cloaks and berets sculpted on to them. I must admit, I've learned a lot from doing them but I wouldn't want to have to convert every model this much, it'd take years to get an army complete.

Anyway, sorry the light ain't brilliant but there's a couple of closeups, first off, we have the man himself, Vet Sgt Harker .....


Next up we have the three standard troopers, including scar face who got hideously disfigured during his dremmel haircut ....


Then there's the special weapon troopers and yes, the middle guy was another dremmeling accident, it was the first time using a dremmel - lol


Finally we have the demo troopers, luckily, I'd got the hang of the dremmel by the time I'd got to these guys ...


So there you have it, the first squad of first platoon, only six or seven more squads to go. Overall, I'm pretty pleased with them, they're not my best painted models, I'm still relearning to paint after my hiatus, but I'm still pretty pleased. Now all I've got to do is finish the second Starstreak Hydra ...

Wednesday 16 November 2011

Scenery Tutorial - Making Tents


Tents are probably one of the most overlooked piece of scenery on the gaming tabletop. To be honest, I don't think I've ever seen one on a 40K table and yet the look great, especially when you combine them with a guard army.

I decided when I made the treatment tent for my Field Ambulance unit that I'd take pics as I built it so I could do this tutorial. I should say that this was my first time working large scale canvas/babywipes, so there was a fair bit learning in it for me. I hope you learn as much as from this project as I did. 

I should say from the start that this isn't a quick project, there's a lot of drying stages in it so it's best to treat it as a side project while you do other things. First off, there's a few materials that you're going to need ...


Here's a list ....
  • Plasticard (or other suitable basing material)
  • Polystyrene foam
  • Babywipes
  • Old sprues
  • Milliput
  • Gravel

First off, start by drawing up a template on some stiff cardboard, I went for a ridge tent style as they were the one's we used when I was a medic in the army, as you can see, the design is pretty simple ....


Once you've got you template done, it's a good idea to measure it up against some models to make sure you've got the proportions right. I went for 2.5 inches tall, 4 inches wide at the base and 3 inches wide at the base of the roof to give it slightly slopping sides ....


If I was going for true scale, then it'd be a lot bigger but then in 40K, it'd end up being bigger than a building, so I settled for a size that looked big enough to get Doc Butcher and his victim ... soz patient in it. You'll also notice in the pic that I glue two pieces of foam together because the template was just slightly taller than one single piece.

Once you're happy with your template, it's time to carve the basic tent shape out of the foam. I first used a hot wire cutter to get the rough shape before using sandpaper to smooth it all off ...


You'll notice that I've also cut a grove into the front of the tent, this is so that there will be a bit of space behind the entrance to the tent. Once the block is done, it's a good idea to mark out the base. I've used plasticard for my base but you could use MDF if you want, just keep away from cardboard as it tends to warp.


For my base, I made sure there was half an inch all round the tent with a bit more at the front as I was planning to add some bits at the front of the tent to make it look a like more interesting. After you've sorted the base, it's time to start cutting up your sprues ...


Just simply cut off the straight bits off your old sprue's (you do save them don't you?) and then clip off and file down all the little side bits that the actual models were fixed to. After you've cleaned up your sprues, it's time to start gluing them to your foam block with pva. The sprue pieces will give the impression that it's a frame once you put your baby wipes on it, so simply lay them out like you would with poles of a frame tent ...


I started with the three main longitudinal poles before adding the cross pieces to the roof. It's a bit of fiddly job but it's not hard. I highly recommend waiting for the glue on the first three pieces to dry before adding in the the cross pieces ...


While you wait for the cross pieces to dry, glue the foam to your base as you'll need it fixed to the base before you do the side pieces ...


Once it's dry, it's time to add the side pieces, don't worry about getting everything perfectly matched up with no gaps, they're going to be covered by the baby wipes anyway...


At this point, it's a good idea to give the grove at the entrance a coating of pva. This is because it's going to be the only bit of the foam that going to be exposed and so you need to protected for when you prime the model. After you've added the side pieces and coated the entrance, leave it overnight to completely dry.

Once it's dried, it's time to add a bit of contouring to the base. I used milliput sculpting putty for this as it's easy to work with and readily available from most good hobby shops. One of the benefits of using milliput is that it bonds to the plasticard really well, pva doesn't stick that well, so the milliput provides the extra bonding to hold the foam base block to the plasticard base. You'll notice that while it was wet, I've pushed in one of the gw barrels and one of their crates. This was to make sure that they sat straight on the base when they were added rather than sitting off level because of the contoured base.


Once the milliput has dried, give the base a good coating of pva, add any big bits you want to decorate the base with and then give it a good covering of gravel. I've got mine sitting on four paint pots on top of a piece of paper. The paint pots lift the base off the surface to make sure the pva doesn't make it stick to the work top (the wife would not be happy with that!) and the piece of paper is there to catch any gravel overspill so I can put it easily back in the tub.


Once again, leave it overnight to completely dry, then shake off any remaining excess and then remove any gravel that's become stuck under the base because of the pva running while it dried. you should be left with something like this ....


The next stage is to paint the entrance black before adding the sheets. Trust me, it's a nightmare to do it after you've added the babywipes, so do it now.


Now that all the basic structural work has been done, it's time to work on the canvas. I highly recommend using babywipes for this. They're cheap, available from virtually every normal shop and more like material than paper towels which means they don't tear like paper towels do. Just make sure you buy the ones without little teddy bears embossed on them. I recommend you go with ASDA Little Angels Extra Care wipes, but if you can't find them, most decent brands will do.

Take your babywipes and dry them out on a radiator. Once dry, use a ruler, a scalpel and your cardboard template to cut out the front and back pieces first. Scalpels with curved blades work best when it comes to cutting babywipes as the normal pointed ones tend to snag the wipes as you cut them. Make sure with the back and the front pieces, you leave a good 7-10mm around the edges to allow it to overlap around the poles and put a slit two thirds down the front of one of the pieces.

Then it's time to cut the main sheet that will cover the top and the sides. It's really important that you get the measuring right on this one, so measure, re-measure and dry fit. If it's too small, it's useless, if it's too large, it'll just look wrong, so take you're time and get it right, the whole model hinges on it being measured right.  


The first pieces to attach are the front and the back pieces. Run a thin thread of pva along the front and back sprues and then attach the babywipe pieces. The important thing is to make sure that you get the bottom level with the ground, once you've got it lined up, leave it to dry.


Once the pieces are fixed in place, mix up some watered down pva, go for a 50/50 mix and then give the pieces a good coating. Use your brush to tuck the overlapping bits around the sprue pieces and straighten up the front entrance flaps. Don't worry if it doesn't completely stick down, it stays wet for quite a while, so there's time to add spots of pva with a brush to bits that aren't sticking down at the edges.

Also, don't worry about any of the watered down pva getting on the gravel, we're going to seal it with watered down pva later anyway. Once again, I've got the model resting on paint pots on a cardboard box, so that any off run doesn't cause the base to stick to the work surface.


Once it' dried a bit, it's time to attached the roof and the sides. Now is the moment of truth where you find out if your measuring was right. Run some pva glue along the remaining exposed sprues and then drape the main piece over your model and leave it to dry. 


Once the main piece is fixed to the model, give it a good soaking of watered down pva. At the same time, cover all the gravel with watered down pva as well. This is to fix it firmly to the base so it doesn't come off when you're painting the model.


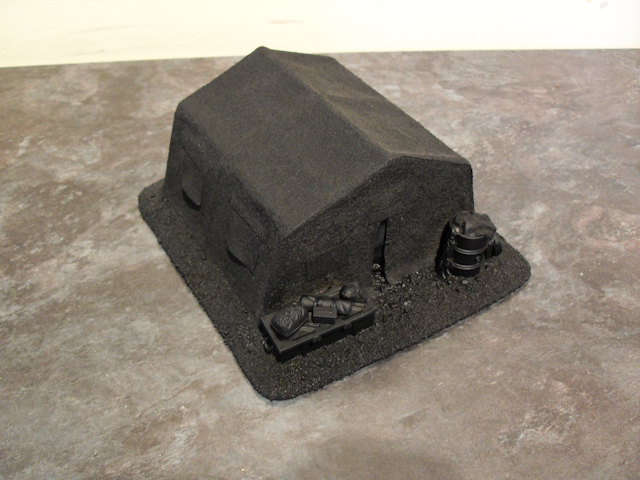
Leave it overnight to dry and then you can start to add the details. I added various windows and flaps made out of bits of babywipes. These were just cut out with a scalpel, dipped in watered down pva and then placed on the model. I also dremmelled out the top of the barrel, filled it with more pva soaked babywipe off cuts as a rag bin and then added a few IG bits just to finish it off. It's down to you how detailed you want to make it.


Leaving it a good day to dry completely, then it's time to prime it up .....


Then you're ready to paint it up, I followed my standard vehicle colour scheme with codex grey and shadow grey banding. The base was done with a base coat of graveyard earth and dry brush of bleached bone. The whole thing was then given a good coating of devlan mud and then it was good to go ...


I hope you liked the tutorial, if you have any questions, just ask in the comments.

Col

PS - It's actually been a few days since I finished this project. With hindsight, I should have positioned the sprue poles so the babywipe hung down and the front and the back. The sides and roof hung off the poles and look really natural. The side were actually stuck flat against the foam and came out flat and speckled with bumps. I'd also have taken the time to do a better doorway by adding a proper roll down flat and a wider entrance.

Don't take me wrong, I love this model but for me it's about learning how to do it better. This was my first time working with large scale canvas and I'm cuffed with the end result. Saying that, my next is going to be a lot better, I've already got it planned. So that's my next big hobby project, I'll tell you more about that in another post!

Saturday 12 November 2011

462 Field Ambulance Squadron


I finally managed to the get treatment tent done recently which means that 462 Field Ambulance Squadron is now complete. Headed up by the infamous Doc Butcher, it's got everything a good medic needs to those injured guardsmen back to the front line.

I've got to say, even though these will probably never see a tabletop battle, it was a really enjoyable project that had bit of everything in it hobby wise and seeing them all together really is the icing on the cake.

Here's the links to the individual pieces ....

Doc Butcher finally gets his tent!


I know that I was supposed to be working on Harker's Squad and my second Starstreak Hydra, but when a friend dropped over some high density foam, I kind of got distracted. I've been meaning to do a treatment tent for my Field Ambulance unit for over a year, so when I got the foam, I broke out the hotwire cutter and baby wipes and got stuck straight in.

Overall, I'm pretty pleased with it, there's the odd bit that could have been done better but then, I've always seen these projects as a chance to learn and I certainly learned a lot with this one. This tent completes my medical unit, so I'll get them all together and do a proper group post soon. In the meantime, here's so pics of Doc Butchers treatment tent ....


So, that's 462 Field Ambulance completed, time to crack on with Harker's squad, hopefully, there won't be any more distractions!

Col

Saturday 5 November 2011

A Quick Update ...

Just thought I'd post a quick update on my hobby progress since getting into our new home as I didn't want you guys to think that I'd disappeared again.

I'm actually working on Harker's squad and my second Starstreak Hydra at the same time which is a bit weird for me as I normally only work on one unit at a time. I simply couldn't decide which to do, so I decided to do them both. The downside of which is that it'll take me long to get finished pics on the blog.

So, here's a couple of pics of my progress, sorry the pics are brilliant, they were done with my phone because I can't find which box I packed our camera in yet!

Anyway, here's the Starstreak Hydra so far .....


Next up we have Harker's squad, I've almost finished their clothing but I wanted to show you their cloaks camo'd up. I still need to tidy up a few of the white spots, especially on Harker's cloak, but they're definitely getting there ...


So, that's it for now gents, I'll be post more as I get them done.

Col

Saturday 29 October 2011

Now it feels like home ...

Hello Strangers ....

I know over the past year or so, my blogging has been a bit off, my commenting dire and my hobby output has been none existent, for that I apologise.

As a bit of background, just over a year ago my business collapsed due to quite a few customers who owed me a lot of money going bust in the recession. The fallout was pretty horrendous, some serious debt and us losing our home and having to move in with family.

As you can tell by my blogging, the whole thing had a pretty drastic affect on my personally and my hobbying. I just couldn't take any joy out of hobbying, it just didn't feel right having time to myself whilst my family weren't in their own home.

Anyway, a couple of weeks ago, we moved into our own home and overall, things are generally on the up. So last week, I took my models out of storage and setup my display cabinets and for the past couple of nights, I've had my painting station out and been cracking on with various projects. Last night, my wife came down after putting the little ones to bed and stood at the doorway, looked straight at me and said 'Now it feels like home'.

So gents, thanks for sticking with me during the past year, although I probably won't be knocking things out at the rate I did before but I've definitely got my mojo back for hobbying and my beloved guard. Anyway, that's enough from me, I'll leave you with a couple of pics of my favourite bits of furniture, I've got to get cracked on with painting up Harkers squad.

All the best
Col Corbane (aka Mel)


Monday 22 August 2011

OK, I might have made a mistake

Hindsight is a wonderful thing, announcing the end of this blog may have been a bit premature. You see, after telling my lovely wife that I wasn't really into 40k anymore, so I'd stopped this blog, she promptly called me quite a offensive word and pointed out that I'd put a lot of effort into it and I should just carry on blogging, but just blog about whatever I do get into.

It sounds so simple when it comes from someone else. So gents, you could say I'm back but with a smallish addition. I'm going to be changing the focus of what I write about from 40k to my adventures in gaming with my little lad.

It's actually quite adept, you see, this blog was named after my little lad Corben, so he's the Corbania bit and I suppose I've become the Prime, not so much Optimus Prime, more like past my prime!

Anyway, so what exactly does this mean. Well, first and foremost, it means that this blog isn't going to be focused mainly on 40k anymore, I'm not sure what it's going to be focused on, that depends on what me and little man decide to get into. I do intend to keep running the parade ground list as it's something that a lot of people like. I'm also pretty sure that there's still going to be some guard involved, but right now I'm seeing Heroquest and maybe some scenery building in the way of a custom built dungeon.

In the meantime, I'm going to leave you with a picture of me and little man enjoying his very first game of Heroquest, well highly modified Heroquest and for the record, he kicked butt, killed the chaos knight and got away with the treasure!


Corbania Prime - A blog about a dad and a lad and their adventures in wargaming!

Sunday 14 August 2011

A long time coming ....

I suppose with hindsight, I really should have typed this blog earlier. Instead, I've let time drift on until tonight. I don't know why tonight, but for some reason I decided now was the time. I didn't want to slowly slip into the night but actually say a 'see ya later guys'.

You see, I've kinda fallen out of love with 40k. There's actually a whole host of reasons why, ranging from the sheer amount of resources in time, money and space it takes to play 40k, to how the game has changed from the 40k I fell in love with all those years ago, to the ever increasing commercialisation of the game. I don't want to sound like I'm bitching as I'm not, 40k has given me years of great fun and it's something that I'm very grateful for.

I'd also like to thank all of you for supporting me through the years as I've explored the 40k hobby, I've really felt like I've belonged to a community and that's something that I'm also very grateful for. So, thanks guys, I really mean it, you've be great. I hope that you all continue to enjoy the hobby as much as I have and keep blogging guys, there's many more like me who just love seeing what you do with the world of 40k.

Finally, I should say, I'm not leaving the hobby, I'm just changing my focus to something that isn't so demanding. I'm not going to say that I'll never come back to 40k, as little man grows up, who knows if the Corbanian 1st will once again grace the battlefield under the command of a young general and if so, this blog might come back to life.

In the meantime, any of you who fancy following me on my new adventures into dungeon delving can follow my new blog on HeroQuest here ....


So gents, thanks for all your support, your inspiration, the laughs and so much more.

See you on the flip side.

Mel aka Col Corbane

Sunday 29 May 2011

My list for BlogWars


So, the deadline passed eleven hours ago and I've spent the morning wondering if the list I'd submitted was the right one. With this being my first tournament, I wasn't sure whether to go with a competitive list or with a more hobby one. I even asked Jay from the Gamers Lounge his thoughts. In the end I decided to pic my favourite models and then try to convert them into some soft of competitive force ...... I think I failed .........

Corbanian 1st - Maelstrom Campaign

HQ: Company Command Squad 217 Pts
Flak Armour; Frag Grenades; Close Combat Weapon (x5); Krak Grenades; Plasmagun (x4); Refractor Field; Melta Bombs; Bolt Pistol; Master of Ordnance;
Chimera: Heavy Bolter; Searchlight; Smoke Launchers; Turret Heavy Bolter; Pintle Heavy Stubber

Elite: 10 Storm Trooper Squad 210 Pts
Carapace Armour; Frag Grenades; Krak Grenades; Close Combat Weapon (x9); Hot-shot Lasgun (x7); Hot-shot Laspistol (x9); Meltagun (x1); Plasmagun (x1); Plasma Pistol; Power Weapon; Special Operations

Elite: 6 Ratling Squad 60 Pts
Flak Armour; Laspistol (x6); Sniper Rifle (x6); Infiltrate; Stealth

Elite: Guardsman Marbo 65 Pts
Demolition Charge; Envenomed Blade; Flak Armour; Frag Grenades; Melta Bombs; Ripper Pistol; Fearless; Fleet; Hit & Run; Move Through Cover; Stealth

Troops: Veteran Squad 200 Pts
Flak Armour; Frag Grenades; Krak Grenades; Close Combat Weapon (x8); Lasgun (x5); Vox Caster; Meltagun (x1); Plasmagun (x2); Lascannon; Chimera
Chimera : Heavy Bolter; Searchlight; Smoke Launchers; Turret Heavy Bolter; Hunter Killer Missile

Troops: Veteran Squad 215 Pts
Gunner Sgt Harker; Heavy Bolter; Flak Armour; Frag Grenades; Krak Grenades; Close Combat Weapon (x9); Lasgun (x7); Missile Launcher; Demolition Charge; Melta Bombs; Heavy Flamer; Meltagun (x1); Plasmagun (x1); Demolitions

Fast Attack: 3 Scout Sentinel : Lascannons 150 Pts

Heavy Support: Leman Russ Demolisher 210 Pts
Demolisher Siege Cannon; Searchlight; Smoke Launchers; Lascannon; Heavy Bolter Sponsons (x2); Pintle Heavy Stubber

Heavy Support: Leman Russ Squadron 230 Pts
Executioner Plasma Cannon; Heavy Bolter; Searchlight; Smoke Launchers; Plasma Cannon Sponsons (x2)

Heavy Support: Leman Russ Vanquisher 190 Pts
Vanquisher Battle Cannon; Searchlight; Smoke Launchers; Lascannon; Heavy Bolter Sponsons (x2)

Total Roster Cost: 1747

So, there you have it, how I'll do, well who knows but at least I get to show off my toys. I'm planning on going just to have a laugh, so I'm not really worried where I'll place, although I don't really want to come last.

I must admit, I've had a few reservations about going, firstly, my mate Mike has had to drop out which means I'm heading out alone. Also, I'm not completely up to speed with the rules, it's been ages since I've played, so I sincerely apologise to the other players in advance.

Finally, I think I might have some problems modelling wise, my heavy weapons teams are on separate bases rather than large ones and my character are all on 60mm bases. I'm not sure if that's modelling for advantage but we'll have to see how the other players take it.

Anyway, excuses aside, this is my first tournament and I'm going for a laugh, so I'm just going to have to see what happens, now, it's time to get Harkers squad finished. 

Sunday 15 May 2011

One big step ....

I've finally finished the first of my StarStreak Hydra's ......


It's been over a year since I last painted a model (time really does fly), so this one's a biggy for me. I'll be honest, I don't feel it's as good as my other models, mainly because I was relearning how to paint as I was painting it. Anyhow, I'm chuffed nonetheless, time to see how it fares in this afternoon's game, although I'm actually thinking of fielding it as a manticore.

Now all I've got to do is finish Harker's squad before Blog Wars.

Saturday 7 May 2011

It appears that I'm stylish!


Well, it appears according to Tristan and Drax that I'm a stylish blogger (thanks gents!).

The Stylish Blogger Award given from one blogger to another one might say, is like a pat on the back for a good job. It's definitely a viral, zombie-like spread of good will so it's too good to pass up. There are four rules;
  • Thank and link back to the person giving you the award
  • Share seven things about yourself
  • Select 10-15 blogs who you think deserve this award
  • Contact these bloggers and let them know about the award
So, that's rule one sorted, now onto rule two, seven things about me .....
  1. I've been playing GW games for over two decades (ok, now I'm feeling old).
  2. Many years ago, I was the youngest college lecturer in the country.
  3. I don't play nearly enough games considering the effort I put into painting models to play with.
  4. I'm married to a tattooist that keeps eyeing up my masses of uninked skin.
  5. For every project I get done, there's twenty projects that don't.
  6. I have an undying passion for dungeon delving and Heroquest.
  7. I don't believe that I'll ever finish my guard army.
Now, onto those who I think are stylish bloggers (in no particular order) ....


In all honesty, there's loads of blogs that I could nominate, check my profile for the rest. Right, I'm off to complete rule number 4, better start digging out those emails.

Thursday 28 April 2011

Just a quick one

I was just looking at my blog and I thought that I really should get a picture of my painting progress posted, so here's a quick snap of the Starstreak Hydra on my painting station ...


Just need to get them finished in time for Blog Wars! I'm off camping for the long weekend, I'm planning on taking the travelling painting kit, so I'll be painting in the sun by the lake.  Hopefully, I'll get quite a bit done :-)

Have fun guys!

Friday 22 April 2011

Back in the Saddle


Well, it's been a fantastic week so far, I've had a well deserved week off from work which has been jam packed with a long weekend away with the nearest and dearest, various family days out and even some hobbying.

So, you could say I'm back in the saddle. Painting is coming along nicely with Harkers squad and one of the Starstreaks getting attention. I'm finding that I've got to relearn to paint again, I suppose I should expect it considering I haven't picked up a paintbrush in almost a year. What skills I had are slowly coming back to me although I have a feeling that these guys aren't going to be my best. Hopefully, it won't be long before I'm painting as well and as fast as I was before.

I've also managed to get a game in against my mate Mike, the Corbanian 1st were victorious against his Space Wolves, so I'm taking it as an good omen. What I did realise is that I've also forgotten quite a lot of the rules for 40k and my Guard, so I think it's time I dugout my MES (multiple edition syndrome) treatment book.

So, I'm definitely back in the saddle now, hopefully I'll be up to speed for Blog Wars in June.

Wednesday 23 March 2011

The Painting Gods are laughing at me

Sometimes, life just knows how to throw a spanner in the works. My models are undercoated, so I sat down tonight to start painting them. Now I have a lot of paints, I had a big collection before my wife got me the huge paint set from GW. I've also been in the hobby for quite a while, so I've got some paints that GW does stock anymore.


But tonight, I only needed one, Codex Grey. Guess what, yep, no codex grey, I've got ghostly grey, I've got space wolves grey, I've got adeptus battlegrey, I've got six pots of fortress grey but not a single pot of codex grey. It sort of stops the painting dead in it's tracks.

So, tomorrow, I'm going to have to nip into GW on the way back from work and pick up another pot. In the meantime, I'm going to crack on with rehydrating my paints, only another 100 odd to go!

Tuesday 22 March 2011

The Freeboota


Many moons ago, I was a member of the 40k Radio Freeboota forums. During that time, they were gathering material for The Freeboota e-zine, so I shared my Magnetising the Valkyrie tutorial with them.

Well, for various reasons, it's been about a year since I submitted it and after leaving the forum, I sort of forgot about it. That was until a few weeks ago when the editor dropped me a line to say it was coming out soon.

Anyway, the e-zine is out now, and if you're interested, take a nose for yourself. Just ignore their comments about my licking, I'm not a deviant, honest.


Also, I actually dug out the painting station and did a little painting yesterday. I've only undercoated Harkers Squad and one of my Starstreak Hydras. It was a small amount hobby wise, but a big step for in getting my mojo going.

Thursday 17 March 2011

Blog Wars!!!!


My hobby mojo has taken a severe beating over the past couple of months, but whilst surfing FTW I spotted just the thing to give me a kick up the backside and get my hobby mojo moving again.

BLOG WARS!!!!

No, it isn't an almighty slanging match between all the various bloggers out there, it's a tournament being organised by Alex from From the Fang that he's setting up for 40k bloggers. So, I've signed up and committed myself to attending it. Hopefully, this commitment will get me off my backside and back into painting.

So, to all my fellow bloggers, check it out, come along if you can and get ready for a botty whooping!

Who am I kidding, it's been that long since I've played, I'm going to have to relearn the rules! As long as I roll some dice and have a laugh, I'm happy.