Showing posts with label Sculpting. Show all posts
Saturday, 26 November 2011
Harker finally gets deployed ....
There's a little bit of me that can't actually believe that I'm typing this. It's been over 18 months since I first started Sgt Harker and his squad of devils, to be honest there were times that I honestly didn't think they'd ever get finished.
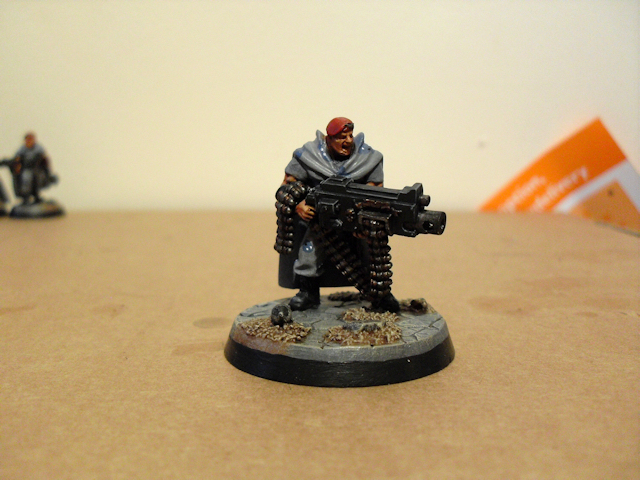
It's hard to imagine what these guys were like when I first started them, they've had a serious amount of conversion work done to them. All the old catachen headwear has been removed and then they've all had t-shirts, cloaks and berets sculpted on to them. I must admit, I've learned a lot from doing them but I wouldn't want to have to convert every model this much, it'd take years to get an army complete.
Anyway, sorry the light ain't brilliant but there's a couple of closeups, first off, we have the man himself, Vet Sgt Harker .....
Next up we have the three standard troopers, including scar face who got hideously disfigured during his dremmel haircut ....
Then there's the special weapon troopers and yes, the middle guy was another dremmeling accident, it was the first time using a dremmel - lol
Finally we have the demo troopers, luckily, I'd got the hang of the dremmel by the time I'd got to these guys ...
So there you have it, the first squad of first platoon, only six or seven more squads to go. Overall, I'm pretty pleased with them, they're not my best painted models, I'm still relearning to paint after my hiatus, but I'm still pretty pleased. Now all I've got to do is finish the second Starstreak Hydra ...
Friday, 10 December 2010
Harker squad finally ready for painting
It's been a long journey and I've learned a hell of a lot about sculpting along the way but now it's time to put the sculpting tools down and get painting!
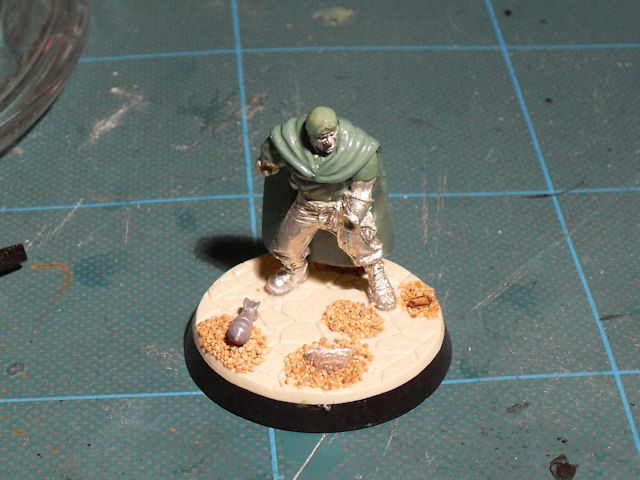
Here's the final pics of Harkers squad in all their green glory ...
The hoods came out quite nice and I've found a relatively simple way of doing them although I need to work on getting them to look more natural and blend into the folds of the cloaks better in the future.
Now it's time to crack open the paints and get these guys camo'd up!
Here's the final pics of Harkers squad in all their green glory ...
Now it's time to crack open the paints and get these guys camo'd up!
Monday, 29 November 2010
Tutorial : How to sculpt green stuff cloaks and capes
As part of my ongoing adventures in sculpting, I've been adding cloaks to Harker's squad. As part of this process, I scoured the net for tutorials on sculpting flat cloaks out of green stuff. To be honest, the results were pretty disappointing.
So, whilst doing Harker, I took plenty of photo's so I could write this tutorial. As I've said before, I'm relatively new to sculpting, so this isn't a masterclass, more a guide on how I did mine for those who've never made flat cloaks before. I should also say that this is more a tutorial on how to make a cape as cloaks have hoods and Harker doesn't have a hood, but at least it will show you the main part and adding a hood is relatively simple.
So, here's a pic of what the finished piece will look like ...
First off, you'll need a few tools. The main ones are the standard sculpting tool, a scalpel and two clay shapers, one with a flat edge and one with a rounded end. You'll also need some vaseline and a flat non-porous surface like a tile, base of a plate or glass bowl lid.
Mix a reasonable amount of green stuff together, I recommend using a mix with more of the blue putty in than the yellow as this will harden quicker making it easier to work the folds of the cloak and it will also produce a harder final cloak when the green stuff cures. Using plenty of water, spread your green stuff into a large flat piece that's larger than the model it's for. Don't worry about finger prints at the moment, just try to get it a about 2mm thick and as flat as possible.
Once you've got your flat piece, get your non-porous surface and spread vaseline over it. This will ensure your green stuff doesn't stick to it whilst you're cutting out the shape. I actually pushed the piece around the glass in small circles a couple of times first so smooth out any finger prints and then used my fingers to smooth out any remaining lumps to get it as flat as possible.
Next, with a wet scalpel, score a line across the bottom of the piece to form the bottom edge of the cloak. Then get your model as a reference and put a little mark in the piece where the collar line will go.
After that, use your wet scalpel to cut out the basic shape of the cloak. The top should be roughly as broad as your models shoulders. You can make the bottom as wide as you like, the more triangular it turns out, the more folds you'll need to put into it to get it hanging naturally from your models shoulders. You'll also notice that there are two points which extend beyond your collar line marking point, these are for going over the models shoulders and wrapping around the front of the model.
Once you have the shape right, careful lift the piece from the surface using your scalpel or the blade of your sculpting tool. Remember at this stage that the bottom is covered is vaseline from the surface, so you'll need to flip it over when you place it on the model, so the smooth side is showing and your non-vaselined side is against the model. Using your flat edge clay shaper, gently push the flaps against the top of your model's shoulders to fix the cloak in place. Don't worry about the tips of the flaps at this stage, just concentrate on fixing the cloak to the model.
You'll notice that the main bulk of the cloak hangs over my finger at the back of the model, this is to make sure that it doesn't stick to the model whilst you work on the shoulders and also ensures that you don't get any finger marks on the main surface.
Once the cloak is fixed, use your flat edged clay shaper to bring the flaps together at the front of the model. It's also a good idea to tidy up the edges of the cloak at this point, both the outside edge and the collar edge.
Next use your wet sculpting tool to score two lines in each flap radiating from where the flaps meet at the front, going across the top of the model's shoulders.
Then use your round ended clay shaper to smooth out your scored lines to form the front folds of the cloak where the material is gathered together. I can't recommend clay shapers enough for this job, they really do help make good looking fabric and clothing.
Once you've got the shoulders and front of the cloak sorted, it's time to work on the back of the cloak. You first need to put the main fold into the cloak. To do this, simply drape the cloak over the handle of one of your clay shapers. Make sure there's vaseline on the handle so it doesn't stick. You may want to help it bend by gently pressing on the edges of the cloak with wet fingers. Once you have the main curve in place, let gravity bend the cloak down naturally. Don't force it, as this could cause it to stick to the back of the model and could end up looking unnatural.
(It was at this point that I realised that I'd made the cloak a bit too long. To solve this, I placed the bottom of the cloak on my vaselined glass lid and trimmed 5mm off the bottom. There's a lesson in that - always measure twice and cut once!)
Next it's time to curve the outer edges of the cloak. Cover your round tipped clay shaper with vaseline including the ferrule (metal bit) and use your flat edged clay shaper to curve the outer edges of the cloak around the ferrule of your other clay shaper. Don't worry if the edges get a little wavy (you'll understand when you do it), just concentrate on getting the basic shape of the folds right.
Once you have the basic shape of the folds right, leave it for ten to fifteen minutes to cure a bit. When it's a bit firmer, you can go back with your clay shapers add smooth out any edges that don't look natural.
Next tidy up the folds as they flow over the shoulders with your rounded tip clay shaper.
Finally, extend the shoulder folds down the back of the cloak by gently scoring lines with your clay shaper. Have the outer lines run almost straight downwards and the inner lines downwards and inwards as if the were going to meet in the middle of the models back.
So, whilst doing Harker, I took plenty of photo's so I could write this tutorial. As I've said before, I'm relatively new to sculpting, so this isn't a masterclass, more a guide on how I did mine for those who've never made flat cloaks before. I should also say that this is more a tutorial on how to make a cape as cloaks have hoods and Harker doesn't have a hood, but at least it will show you the main part and adding a hood is relatively simple.
So, here's a pic of what the finished piece will look like ...
First off, you'll need a few tools. The main ones are the standard sculpting tool, a scalpel and two clay shapers, one with a flat edge and one with a rounded end. You'll also need some vaseline and a flat non-porous surface like a tile, base of a plate or glass bowl lid.
Mix a reasonable amount of green stuff together, I recommend using a mix with more of the blue putty in than the yellow as this will harden quicker making it easier to work the folds of the cloak and it will also produce a harder final cloak when the green stuff cures. Using plenty of water, spread your green stuff into a large flat piece that's larger than the model it's for. Don't worry about finger prints at the moment, just try to get it a about 2mm thick and as flat as possible.
Once you've got your flat piece, get your non-porous surface and spread vaseline over it. This will ensure your green stuff doesn't stick to it whilst you're cutting out the shape. I actually pushed the piece around the glass in small circles a couple of times first so smooth out any finger prints and then used my fingers to smooth out any remaining lumps to get it as flat as possible.
Next, with a wet scalpel, score a line across the bottom of the piece to form the bottom edge of the cloak. Then get your model as a reference and put a little mark in the piece where the collar line will go.
After that, use your wet scalpel to cut out the basic shape of the cloak. The top should be roughly as broad as your models shoulders. You can make the bottom as wide as you like, the more triangular it turns out, the more folds you'll need to put into it to get it hanging naturally from your models shoulders. You'll also notice that there are two points which extend beyond your collar line marking point, these are for going over the models shoulders and wrapping around the front of the model.
Once you have the shape right, careful lift the piece from the surface using your scalpel or the blade of your sculpting tool. Remember at this stage that the bottom is covered is vaseline from the surface, so you'll need to flip it over when you place it on the model, so the smooth side is showing and your non-vaselined side is against the model. Using your flat edge clay shaper, gently push the flaps against the top of your model's shoulders to fix the cloak in place. Don't worry about the tips of the flaps at this stage, just concentrate on fixing the cloak to the model.
You'll notice that the main bulk of the cloak hangs over my finger at the back of the model, this is to make sure that it doesn't stick to the model whilst you work on the shoulders and also ensures that you don't get any finger marks on the main surface.
Once the cloak is fixed, use your flat edged clay shaper to bring the flaps together at the front of the model. It's also a good idea to tidy up the edges of the cloak at this point, both the outside edge and the collar edge.
Next use your wet sculpting tool to score two lines in each flap radiating from where the flaps meet at the front, going across the top of the model's shoulders.
Then use your round ended clay shaper to smooth out your scored lines to form the front folds of the cloak where the material is gathered together. I can't recommend clay shapers enough for this job, they really do help make good looking fabric and clothing.
Once you've got the shoulders and front of the cloak sorted, it's time to work on the back of the cloak. You first need to put the main fold into the cloak. To do this, simply drape the cloak over the handle of one of your clay shapers. Make sure there's vaseline on the handle so it doesn't stick. You may want to help it bend by gently pressing on the edges of the cloak with wet fingers. Once you have the main curve in place, let gravity bend the cloak down naturally. Don't force it, as this could cause it to stick to the back of the model and could end up looking unnatural.
(It was at this point that I realised that I'd made the cloak a bit too long. To solve this, I placed the bottom of the cloak on my vaselined glass lid and trimmed 5mm off the bottom. There's a lesson in that - always measure twice and cut once!)
Next it's time to curve the outer edges of the cloak. Cover your round tipped clay shaper with vaseline including the ferrule (metal bit) and use your flat edged clay shaper to curve the outer edges of the cloak around the ferrule of your other clay shaper. Don't worry if the edges get a little wavy (you'll understand when you do it), just concentrate on getting the basic shape of the folds right.
Once you have the basic shape of the folds right, leave it for ten to fifteen minutes to cure a bit. When it's a bit firmer, you can go back with your clay shapers add smooth out any edges that don't look natural.
Next tidy up the folds as they flow over the shoulders with your rounded tip clay shaper.
Finally, extend the shoulder folds down the back of the cloak by gently scoring lines with your clay shaper. Have the outer lines run almost straight downwards and the inner lines downwards and inwards as if the were going to meet in the middle of the models back.
At this point, the main cape part of the cloak is done. As you can see below, you can easily make a number of different looking flat cloaks using these simple techniques.
You can take the cloak further once the green stuff has hardened by adding a clasp where the cloak meets at the front or by adding a hood. You could also modify the technique I've shown you here to make more realistic cloaks by feathering the bottom edge and adding tears into the fabric at the cutting stage but I'll save those for a future tutorial.
Hope you find it useful guys and as always, if you've got anything to add, add it in the comments. I'm always interested in learning more.
Saturday, 27 November 2010
Update on Harkers squad
I thought I'd do a quick post on the progress of Harker's Squad. As I posted earlier, Harker's cloak got broke. This wasn't an accident, I did it because I've been playing around with sculpting cloaks and I reckoned that my newer type cloaks looked better than his old one which was very bumpy and patchily put together.
I've always liked the look of the flatter cloaks, compared to the more bulky fold styles ones. Dave Taylor has some excellent ones on his Tanith squad over on his blog. So, I bit the bullet and gave it a go. They're not perfect but for a first go, they turned out ok. First off, here's Harker ...
Next up, we have the lasgunners ....
Then the special weapon guys ....
Finally, here's the missile launcher team and the demo guy ...
There's still a bit of work to do on them such as adding the hoods and clasps on the cloaks. So guys, what do you reckon, do you think I've managed to pull it off?
I've always liked the look of the flatter cloaks, compared to the more bulky fold styles ones. Dave Taylor has some excellent ones on his Tanith squad over on his blog. So, I bit the bullet and gave it a go. They're not perfect but for a first go, they turned out ok. First off, here's Harker ...
Next up, we have the lasgunners ....
Then the special weapon guys ....
Finally, here's the missile launcher team and the demo guy ...
There's still a bit of work to do on them such as adding the hoods and clasps on the cloaks. So guys, what do you reckon, do you think I've managed to pull it off?
Monday, 22 November 2010
Harker got broke!
That's right, my Harker model got broke, the cloak has come well and truly off!
So, how did this happen? Was it an accident? Was it done maliciously? Am I heart broken considering the hours I put into sculpting the cloak? Can it be fixed?
Thursday, 18 November 2010
Harkers squad got badged
I broke out the green stuff and sculpting tools this week and managed to make a little progress on Harkers squad. My plan was to get their cap badges done. It's been a while since I last sculpted so I was a bit worried that I'd wouldn't be able to pull it off. Surprisingly, they came out pretty well, although it took a few attempts to get it right. Here's how they turned out ...
Overall, I'm pretty pleased with how they turned out. Some of them are pretty good and some are a bit iffy, but I'm not being too critical on myself as it was my first attempt at sculpting such small details.
What I've learned this time ...
Hopefully, I'll find one soon and get these guys finished and ready for painting. In the meantime, I'll be cracking on with my Starstreak Hydra's.
Overall, I'm pretty pleased with how they turned out. Some of them are pretty good and some are a bit iffy, but I'm not being too critical on myself as it was my first attempt at sculpting such small details.
What I've learned this time ...
- When doing small details, it's best to push the green stuff completely flat to ensure it sticks and then push it toward the center to build the details.
- Don't sculpt small details late at night when my eyes are tired.
- It's easy to keep going over the same sculpt trying to get it perfect but at this stage in my sculpting, it's best to get it pretty good and leave it there rather than overworking it and getting annoyed.
Hopefully, I'll find one soon and get these guys finished and ready for painting. In the meantime, I'll be cracking on with my Starstreak Hydra's.
Sunday, 29 August 2010
Harkers squad got greened.
I thought it'd be a pretty simple idea, just a bit of dremelling and green stuff up some t-shirts and berets, how wrong can you be. It's taken quite a while to get these guys up to this stage, it's been a steep learning curve but well worth the effort.
First off, I dremelled away all the catachens headbands, bandanna's and arm bands. This went pretty well although I did get a bit over zealous at times and this resulted in me having to rebuild up some of the guys arm muscles. Once I got rid of their rockstar look, I started to build up their t-shirts to match their leader VSgt Harker and once they'd cured, I worked up their berets. Initially they came out a bit clunky but by the time I was halfway into the squad, I got the technique right and the last few turned out quite good, well at least to the first ones.
So, here's the squad so far ....
Next three .....
Last three ....
Now all I need to do is do their cap badges and give them cloaks. I'm not looking forward to do the cap badges as I remember how fiddly it was to do VSgt Harker's. The cloaks are going to have to wait until I've figured out a way to do them, so it's time to start hitting the net for tutorials. Anyway, here's the squad so far ...
Overall, I'm pretty pleased with them, yes they've taken a while to get to this stage but it's been a good learning exercise. I've found that I'm getting better at using the metal sculpting tools, it amazing how quickly you adapt when you force yourself use a different tool or technique.
What I've learned this time ...
First off, I dremelled away all the catachens headbands, bandanna's and arm bands. This went pretty well although I did get a bit over zealous at times and this resulted in me having to rebuild up some of the guys arm muscles. Once I got rid of their rockstar look, I started to build up their t-shirts to match their leader VSgt Harker and once they'd cured, I worked up their berets. Initially they came out a bit clunky but by the time I was halfway into the squad, I got the technique right and the last few turned out quite good, well at least to the first ones.
So, here's the squad so far ....
Next three .....
Last three ....
Now all I need to do is do their cap badges and give them cloaks. I'm not looking forward to do the cap badges as I remember how fiddly it was to do VSgt Harker's. The cloaks are going to have to wait until I've figured out a way to do them, so it's time to start hitting the net for tutorials. Anyway, here's the squad so far ...
Overall, I'm pretty pleased with them, yes they've taken a while to get to this stage but it's been a good learning exercise. I've found that I'm getting better at using the metal sculpting tools, it amazing how quickly you adapt when you force yourself use a different tool or technique.
What I've learned this time ...
- A little bit of green stuff goes a long way.
- Use the metal tool to get the basic shape you want, then the clay shapers to smooth out the shape and then back to the metal tool to sharpen the details.
- The more reference material you have to work from, the better your sculpt.
Monday, 26 July 2010
Camping + Green Stuff = Hobby Goodness!
After my last post on Friday, I was just getting the last of the things together for camping when I had a idea. I might not have been able to do any work on my models whilst camping, but there was no reason why I couldn't practice some sculpting.
I grabbed my sculpting kit comprising of my tools, some green stuff, my little pink tin of vaseline (the one with the daemon faces) and a piece of plasticard to work on.
So, I found myself on Saturday afternoon watching the kids play and decided to break out the sculpting stuff and kill some time. After a little thinking about what I should sculpt, I settled on stowage for my vehicles. I've run out of the GW stowage and the new kits don't automatically come with the accessory sprue, so I figured making my own might be a good idea. A few hours later, I came up with this .....
First off, I had a go at getting the basic shape with the straps and cloth flap, I also tried to put some texture on it, but that turned out a bit of a fail.
After it was done, I realised that it was a bit static and didn't really look like it was hanging off the side of a tank so the next one, I worked on making it look a bit more natural. I also added some more pronounced creases by the straps.
That one turned out better, so I gave it another go trying to get more of a hang to the material.
At that point, I was quite happy with how the material looked hanging and decided to try and up my game by adding a buckle to a strap. I managed to get the basic shape of the buckle down but failed on the strap and didn't even attempt a pin.
After getting the basic shape of the buckle down, I tried to improve on it with the next. This one came out a little chunky but all the details were there. I had the buckle, pin and the strap looked ok.
Next up, I tried adding the straps separately after getting the basic shape of the cloth down. these turned out a bit chunky, so I slight fail there but I added a central strap and buckle which was a lot smaller than the last ones and ended up looking ok.
Finally, I put together everything I'd practiced earlier and came up with some stowage with double straps with buckles. I'm really pleased with how this one came out, there's room for improvement but I really feel like like with a bit more practice I'll have them down to a tee.
I always feel that close ups of sculpting show up all the flaws, much like close ups of painted models, so here's a pic that's close to what it looks like in real life (at least on my laptop screen - lol).
Another plus was the fact that they were all done with the GW sculpting tool. In the past, I've never been able to use the metal tools and so all my work was done with the clay shapers. Now, I can't see how I managed to sculpt with the clay shapers in the first place.
So my camping trip was a good weekend and gave me a chance to up my sculpting skills - double win!
I grabbed my sculpting kit comprising of my tools, some green stuff, my little pink tin of vaseline (the one with the daemon faces) and a piece of plasticard to work on.
So, I found myself on Saturday afternoon watching the kids play and decided to break out the sculpting stuff and kill some time. After a little thinking about what I should sculpt, I settled on stowage for my vehicles. I've run out of the GW stowage and the new kits don't automatically come with the accessory sprue, so I figured making my own might be a good idea. A few hours later, I came up with this .....
First off, I had a go at getting the basic shape with the straps and cloth flap, I also tried to put some texture on it, but that turned out a bit of a fail.
After it was done, I realised that it was a bit static and didn't really look like it was hanging off the side of a tank so the next one, I worked on making it look a bit more natural. I also added some more pronounced creases by the straps.
That one turned out better, so I gave it another go trying to get more of a hang to the material.
At that point, I was quite happy with how the material looked hanging and decided to try and up my game by adding a buckle to a strap. I managed to get the basic shape of the buckle down but failed on the strap and didn't even attempt a pin.
After getting the basic shape of the buckle down, I tried to improve on it with the next. This one came out a little chunky but all the details were there. I had the buckle, pin and the strap looked ok.
Next up, I tried adding the straps separately after getting the basic shape of the cloth down. these turned out a bit chunky, so I slight fail there but I added a central strap and buckle which was a lot smaller than the last ones and ended up looking ok.
Finally, I put together everything I'd practiced earlier and came up with some stowage with double straps with buckles. I'm really pleased with how this one came out, there's room for improvement but I really feel like like with a bit more practice I'll have them down to a tee.
I always feel that close ups of sculpting show up all the flaws, much like close ups of painted models, so here's a pic that's close to what it looks like in real life (at least on my laptop screen - lol).
Another plus was the fact that they were all done with the GW sculpting tool. In the past, I've never been able to use the metal tools and so all my work was done with the clay shapers. Now, I can't see how I managed to sculpt with the clay shapers in the first place.
So my camping trip was a good weekend and gave me a chance to up my sculpting skills - double win!
Subscribe to:
Posts (Atom)