
Tents are probably one of the most overlooked piece of scenery on the gaming tabletop. To be honest, I don't think I've ever seen one on a 40K table and yet the look great, especially when you combine them with a guard army.
I decided when I made the treatment tent for my Field Ambulance unit that I'd take pics as I built it so I could do this tutorial. I should say that this was my first time working large scale canvas/babywipes, so there was a fair bit learning in it for me. I hope you learn as much as from this project as I did.
I should say from the start that this isn't a quick project, there's a lot of drying stages in it so it's best to treat it as a side project while you do other things. First off, there's a few materials that you're going to need ...

Here's a list ....
- Plasticard (or other suitable basing material)
- Polystyrene foam
- Babywipes
- Old sprues
- Milliput
- Gravel
First off, start by drawing up a template on some stiff cardboard, I went for a ridge tent style as they were the one's we used when I was a medic in the army, as you can see, the design is pretty simple ....

Once you've got you template done, it's a good idea to measure it up against some models to make sure you've got the proportions right. I went for 2.5 inches tall, 4 inches wide at the base and 3 inches wide at the base of the roof to give it slightly slopping sides ....

If I was going for true scale, then it'd be a lot bigger but then in 40K, it'd end up being bigger than a building, so I settled for a size that looked big enough to get Doc Butcher and his victim ... soz patient in it. You'll also notice in the pic that I glue two pieces of foam together because the template was just slightly taller than one single piece.
Once you're happy with your template, it's time to carve the basic tent shape out of the foam. I first used a hot wire cutter to get the rough shape before using sandpaper to smooth it all off ...

You'll notice that I've also cut a grove into the front of the tent, this is so that there will be a bit of space behind the entrance to the tent. Once the block is done, it's a good idea to mark out the base. I've used plasticard for my base but you could use MDF if you want, just keep away from cardboard as it tends to warp.

For my base, I made sure there was half an inch all round the tent with a bit more at the front as I was planning to add some bits at the front of the tent to make it look a like more interesting. After you've sorted the base, it's time to start cutting up your sprues ...

Just simply cut off the straight bits off your old sprue's (you do save them don't you?) and then clip off and file down all the little side bits that the actual models were fixed to. After you've cleaned up your sprues, it's time to start gluing them to your foam block with pva. The sprue pieces will give the impression that it's a frame once you put your baby wipes on it, so simply lay them out like you would with poles of a frame tent ...

I started with the three main longitudinal poles before adding the cross pieces to the roof. It's a bit of fiddly job but it's not hard. I highly recommend waiting for the glue on the first three pieces to dry before adding in the the cross pieces ...

While you wait for the cross pieces to dry, glue the foam to your base as you'll need it fixed to the base before you do the side pieces ...

Once it's dry, it's time to add the side pieces, don't worry about getting everything perfectly matched up with no gaps, they're going to be covered by the baby wipes anyway...

At this point, it's a good idea to give the grove at the entrance a coating of pva. This is because it's going to be the only bit of the foam that going to be exposed and so you need to protected for when you prime the model. After you've added the side pieces and coated the entrance, leave it overnight to completely dry.
Once it's dried, it's time to add a bit of contouring to the base. I used milliput sculpting putty for this as it's easy to work with and readily available from most good hobby shops. One of the benefits of using milliput is that it bonds to the plasticard really well, pva doesn't stick that well, so the milliput provides the extra bonding to hold the foam base block to the plasticard base. You'll notice that while it was wet, I've pushed in one of the gw barrels and one of their crates. This was to make sure that they sat straight on the base when they were added rather than sitting off level because of the contoured base.

Once the milliput has dried, give the base a good coating of pva, add any big bits you want to decorate the base with and then give it a good covering of gravel. I've got mine sitting on four paint pots on top of a piece of paper. The paint pots lift the base off the surface to make sure the pva doesn't make it stick to the work top (the wife would not be happy with that!) and the piece of paper is there to catch any gravel overspill so I can put it easily back in the tub.

Once again, leave it overnight to completely dry, then shake off any remaining excess and then remove any gravel that's become stuck under the base because of the pva running while it dried. you should be left with something like this ....

The next stage is to paint the entrance black before adding the sheets. Trust me, it's a nightmare to do it after you've added the babywipes, so do it now.

Now that all the basic structural work has been done, it's time to work on the canvas. I highly recommend using babywipes for this. They're cheap, available from virtually every normal shop and more like material than paper towels which means they don't tear like paper towels do. Just make sure you buy the ones without little teddy bears embossed on them. I recommend you go with ASDA Little Angels Extra Care wipes, but if you can't find them, most decent brands will do.
Take your babywipes and dry them out on a radiator. Once dry, use a ruler, a scalpel and your cardboard template to cut out the front and back pieces first. Scalpels with curved blades work best when it comes to cutting babywipes as the normal pointed ones tend to snag the wipes as you cut them. Make sure with the back and the front pieces, you leave a good 7-10mm around the edges to allow it to overlap around the poles and put a slit two thirds down the front of one of the pieces.
Then it's time to cut the main sheet that will cover the top and the sides. It's really important that you get the measuring right on this one, so measure, re-measure and dry fit. If it's too small, it's useless, if it's too large, it'll just look wrong, so take you're time and get it right, the whole model hinges on it being measured right.

The first pieces to attach are the front and the back pieces. Run a thin thread of pva along the front and back sprues and then attach the babywipe pieces. The important thing is to make sure that you get the bottom level with the ground, once you've got it lined up, leave it to dry.

Once the pieces are fixed in place, mix up some watered down pva, go for a 50/50 mix and then give the pieces a good coating. Use your brush to tuck the overlapping bits around the sprue pieces and straighten up the front entrance flaps. Don't worry if it doesn't completely stick down, it stays wet for quite a while, so there's time to add spots of pva with a brush to bits that aren't sticking down at the edges.
Also, don't worry about any of the watered down pva getting on the gravel, we're going to seal it with watered down pva later anyway. Once again, I've got the model resting on paint pots on a cardboard box, so that any off run doesn't cause the base to stick to the work surface.

Once it' dried a bit, it's time to attached the roof and the sides. Now is the moment of truth where you find out if your measuring was right. Run some pva glue along the remaining exposed sprues and then drape the main piece over your model and leave it to dry.

Once the main piece is fixed to the model, give it a good soaking of watered down pva. At the same time, cover all the gravel with watered down pva as well. This is to fix it firmly to the base so it doesn't come off when you're painting the model.

Leave it overnight to dry and then you can start to add the details. I added various windows and flaps made out of bits of babywipes. These were just cut out with a scalpel, dipped in watered down pva and then placed on the model. I also dremmelled out the top of the barrel, filled it with more pva soaked babywipe off cuts as a rag bin and then added a few IG bits just to finish it off. It's down to you how detailed you want to make it.

Leaving it a good day to dry completely, then it's time to prime it up .....
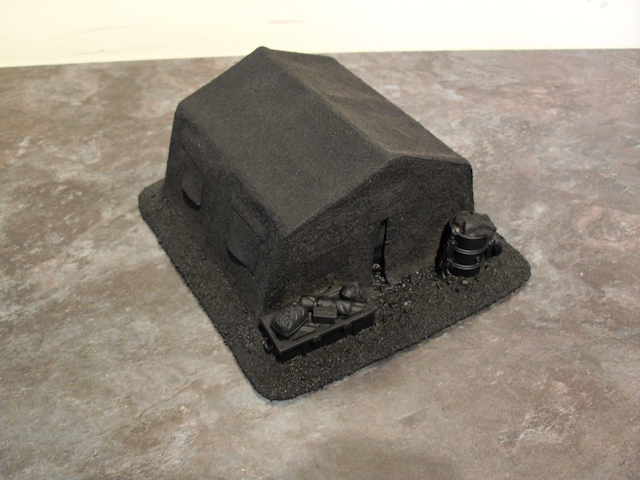
Then you're ready to paint it up, I followed my standard vehicle colour scheme with codex grey and shadow grey banding. The base was done with a base coat of graveyard earth and dry brush of bleached bone. The whole thing was then given a good coating of devlan mud and then it was good to go ...
I hope you liked the tutorial, if you have any questions, just ask in the comments.
Col
PS - It's actually been a few days since I finished this project. With hindsight, I should have positioned the sprue poles so the babywipe hung down and the front and the back. The sides and roof hung off the poles and look really natural. The side were actually stuck flat against the foam and came out flat and speckled with bumps. I'd also have taken the time to do a better doorway by adding a proper roll down flat and a wider entrance.
Don't take me wrong, I love this model but for me it's about learning how to do it better. This was my first time working with large scale canvas and I'm cuffed with the end result. Saying that, my next is going to be a lot better, I've already got it planned. So that's my next big hobby project, I'll tell you more about that in another post!


